Docker Containerization Guidelines#
Important
By default, all Docker containers are pre-configured and ready to use.
The editable development version of scikit-plots is already installed,
so you can verify the installation immediately by running:
scikitplot -V
Important
Once the Docker environment is ready to use, you can proceed to the quickstart section to verify the build:
See also
🐋 Docker Containerization#
💡 Work on Docker Desktop or Github Codespaces
Here’s how containerization works:
Isolation: Containers run independently of each other and the host system, ensuring that they don’t interfere with other applications or containers.
Portability: Since containers include everything the application needs to run, they can be moved between different environments (like from development to production) without any compatibility issues.
Efficiency: Containers are more lightweight than virtual machines (VMs) because they share the host OS’s kernel rather than running their own separate operating system. This makes them faster and more resource-efficient.
Consistency: The application inside the container runs the same way regardless of where it’s deployed, ensuring consistency across environments.
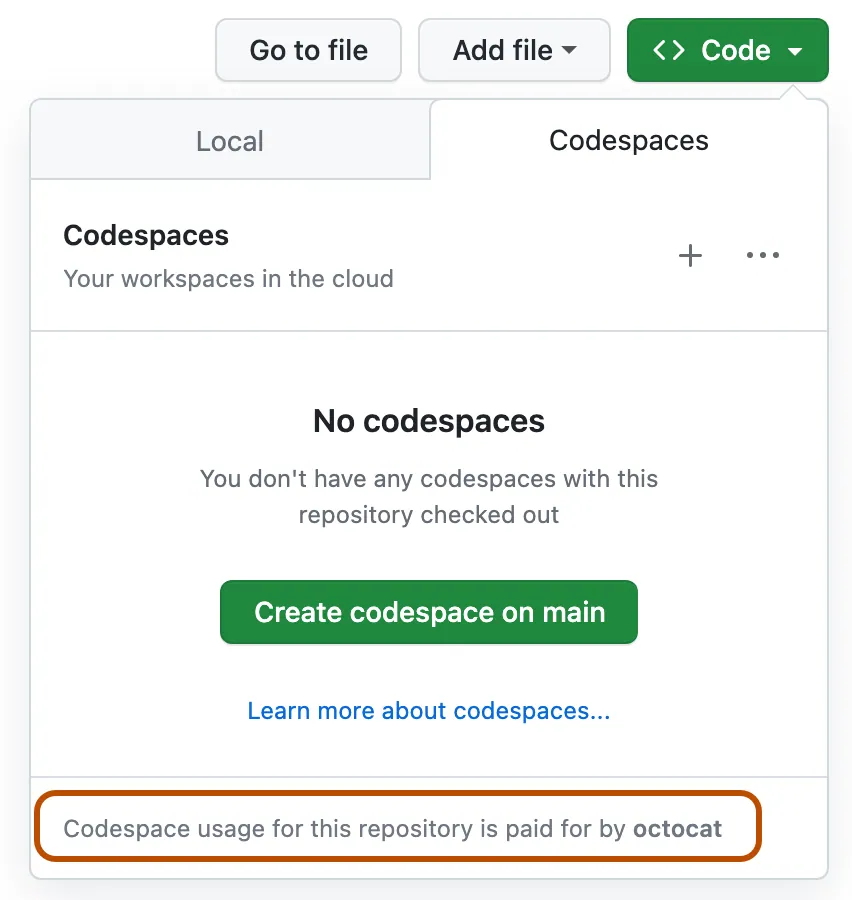
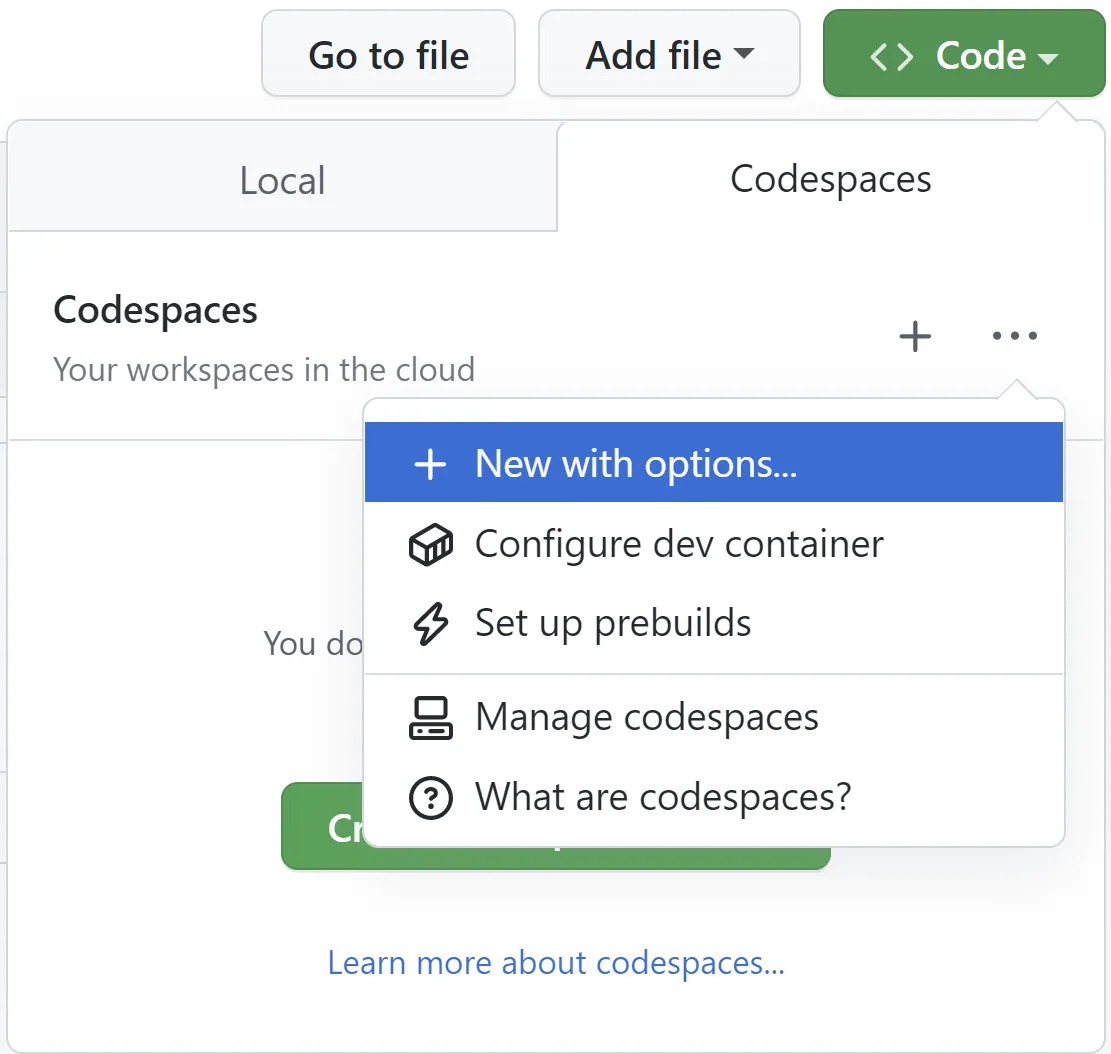
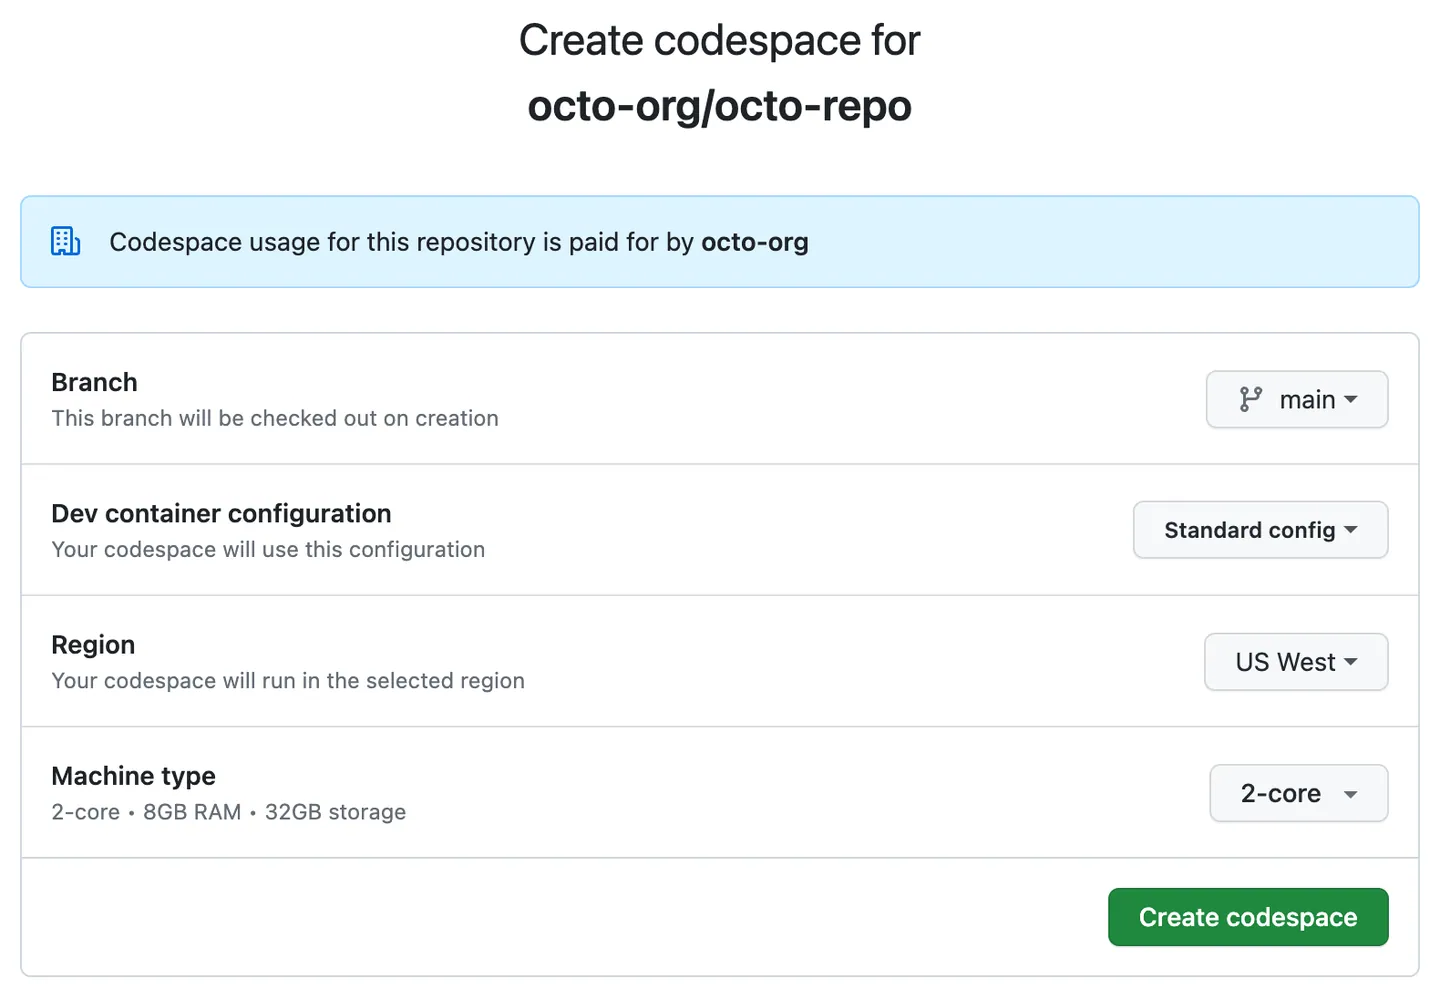
🏷️ Github Codespaces Guide#
(Connect IDE Interface Vscode or Jupyter Notebook)
👉 (recommended) Choose (recommended) not (default) Option for best practise:
Step by step:
🏷️ Docker Desktop Guide#
## Forked repo: https://github.com/scikit-plots/scikit-plots.git
git clone https://github.com/YOUR-USER-NAME/scikit-plots.git
cd scikit-plots/docker

## Use terminal or open to vscode to run ``docker compose``
code .
Docker Environment Setup for IDE (Vscode/Jupyter) and/or NVIDIA GPU driver
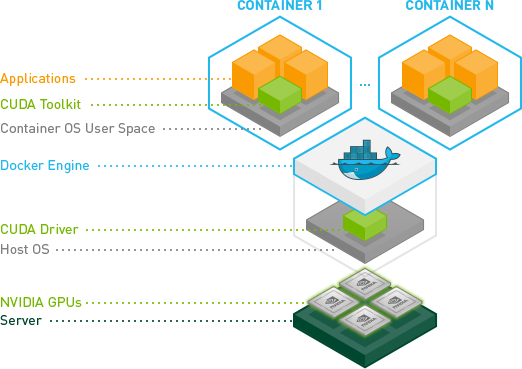
This repository contains Docker & Docker Compose configurations for running Jupyter Notebooks with optional NVIDIA GPU support.
You can run containers with either host-installed CUDA or pre-installed CUDA inside the container.
🐳 Docker Compose Quickstart Guide#
(Optionally) 📦 Prebuilt Image from Docker Hub#
See also
You can use the prebuilt image directly from Docker Hub:
📄 Docker Hub: hub.docker.com/r/scikitplot/scikit-plots
# docker pull scikitplot/scikit-plots
docker run -it --rm scikitplot/scikit-plots bash
🏷️ Using Docker Compose: The easiest way to launch the environment.#
▶️ Run Docker Env Jupyter Notebook (CPU only)
docker compose up --build scikit-plots_latest-jupyter
▶️ Run Docker Env Jupyter Notebook (With NVIDIA Host GPU)
docker compose up --build app_nvidia_host_gpu_driver
▶️ Run Docker Env Jupyter Notebook (With NVIDIA Internal CUDA GPU)
docker compose up --build app_nvidia_internal_gpu_driver
▶️ Run Docker Env Jupyter Notebook by VS Code#
▶️ Connect Docker Container Especially When Docker-GUI dont available#
# docker-compose up --build scikit-plots_latest-jupyter

docker ps  # check running containers
docker logs CONTAINER_ID_OR_NAME  # find jupyter (token) http address 127.0....
docker exec -it CONTAINER_ID_OR_NAME bash  # Connect interactive terminal
▶️ Run setup_vscode_extensions.sh#
## (Optionally) Install common vscode extensions
##✅ C/C++/Python and Jupyter Notebook
##✅ Linter and Formatter
bash docker/scripts/setup_vscode_extensions.sh  # (not needed every time)
▶️ Run post_create_commands.sh#
“See Also: bash-first-run-notice.txt”
bash-first-run-notice.txt#
👋  Welcome to the `scikit-plots` Dev Environment (Docker / Codespaces)

🧭  Quick Navigation:
• 🔎  Open the Command Palette → `Ctrl+Shift+P` / `Cmd+Shift+P` or `F1`
• 📘  Quick Start → https://scikit-plots.github.io/dev/introduction/quick_start.html
• 🛠️  Dev Guide → https://scikit-plots.github.io/dev/devel/index.html

━━━━━━━━━━━━━━━━━━━━━━━━━━━━━━━━━━━━━━━━━━━━━━━━━━━━━━━━━━━━━━━━━━━━━━
⭐ 🌟  IMPORTANT: Complete Environment Setup
━━━━━━━━━━━━━━━━━━━━━━━━━━━━━━━━━━━━━━━━━━━━━━━━━━━━━━━━━━━━━━━━━━━━━━

✅  Troubleshooting VsCode Guide "micromamba" Env:
  $ # https://code.visualstudio.com/assets/docs/getstarted/tips-and-tricks/KeyboardReferenceSheet.png
  $ # Command Palette (`Ctrl+Shift+P`) or on GUI click top "Open Quick Access" and type `> interpreter`
  $ # if display "micromamba" Env choose it, If not exist choose "Enter interpreter path..." then enter "/root/micromamba/envs/py311/bin/python"

✅  Check Installation:
  $ python -c "import scikitplot; scikitplot.show_config()"
  $ scikitplot -V

✅  Post-Create Setup All-In-One Script (Recommended):
  $ bash docker/scripts/all_post_create.sh

✅  Git Safe Configs:
  $ # bash docker/scripts/git_add_safe_dirs.sh  # add safe directories for git
  $ git config --global --add safe.directory '*'

✅  (Optionally) Git Submodules Clone/Download/Initialize Configs, Not Needed Every Time:
  $ git submodule update --init
  $ git submodule update --init --recursive

✅  Git Upstream Configs:
  $ git remote add upstream https://github.com/scikit-plots/scikit-plots.git

✅  Git Tag Configs:
  $ git fetch upstream --tags

✅  Create Environment (Conda/Mamba/Micromamba):
  $ conda create -n py311 python=3.11 ipykernel -y
  $ conda activate py311

✅  Install Build Dependencies:
  $ pip install -r requirements/build.txt
  $ pip install -r requirements/all.txt

✅  (Optional) Install CPU-specific packages:
  $ pip install -r requirements/cpu.txt

✅  Git hooks manager Initialize, Ensures code meets quality standards before it
  $ pre-commit install

✅  Install the current package in editable mode, using the current environment for building, and ignore cached builds:
  $ pip install --no-build-isolation --no-cache-dir -e . -vvv

━━━━━━━━━━━━━━━━━━━━━━━━━━━━━━━━━━━━━━━━━━━━━━━━━━━━━━━━━━━━━━━━━━━━━━
📦  Environment Management Notes (Conda/Anaconda/Miniconda/Miniforge/Mamba/Micromamba):
━━━━━━━━━━━━━━━━━━━━━━━━━━━━━━━━━━━━━━━━━━━━━━━━━━━━━━━━━━━━━━━━━━━━━━

• Initialize Conda shell support (if needed):
  # https://mamba.readthedocs.io/en/latest/installation/micromamba-installation.html
  $ micromamba shell init --shell bash
  $ mamba init
  $ conda init

• See environments:
  $ micromamba --version
  $ micromamba info -e
  $ micromamba info -e | awk '/py312/ {print $NF}'
  $ mamba info -e
  $ conda info -e

• Activate environments (depending on tool):
  # root@sp-docker /work/docs (subpackage-bug-fix)
  $ micromamba activate py311
  $ mamba activate py311
  $ conda activate py311

• Activate environments by path (depending on tool):
  $ micromamba activate /root/micromamba/envs/py312

  # Activate the first environment whose prefix contains py312:
  $ micromamba activate "$(micromamba info -e | awk '/\/py312$/ {print $NF}')"

  # Extract the path automatically:
  $ micromamba activate "$(micromamba info -e | grep py312 | awk '{print $NF}')"

  # Activate the first non-base environment:
  $ micromamba activate "$( micromamba info -e | awk 'NR>2 && $1!="base" {print $NF; exit}' )"

  # Newest environment directory by modification time:
  $ micromamba activate "$( ls -td /root/micromamba/envs/* | head -n1 )"

  # Test pip show:
  $ micromamba run -p "$(ls -td /root/micromamba/envs/* | head -n1)" python -m pip show scikit-plots || echo "⚠️ 'scikit-plots' Not Found."
  $ micromamba run -p "$(ls -td /root/micromamba/envs/* | head -n1)" python -m pip show scikit-plots 2>/dev/null | awk '/^Version:/ {print $2}' || echo "⚠️ 'scikit-plots' Not Found."

  # Test pip list:
  $ micromamba run -p "$(ls -td /root/micromamba/envs/* | head -n1)" python -m pip list --format=freeze 2>/dev/null | grep '^scikit-plots==' || echo "⚠️ 'scikit-plots' Not Found."
  $ micromamba run -p "$(ls -td /root/micromamba/envs/* | head -n1)" python -m pip list --format=freeze 2>/dev/null | awk -F'==' '/^scikit-plots==/ {print $2}' || echo "⚠️ 'scikit-plots' Not Found."

━━━━━━━━━━━━━━━━━━━━━━━━━━━━━━━━━━━━━━━━━━━━━━━━━━━━━━━━━━━━━━━━━━━━━━
💡  Troubleshooting:
━━━━━━━━━━━━━━━━━━━━━━━━━━━━━━━━━━━━━━━━━━━━━━━━━━━━━━━━━━━━━━━━━━━━━━

• 💽  Disk Space:
  $ df -h && du -h --max-depth=1

• 💾  Creation logs (Codespaces):
  ⚠️ 👇 Check Codespace Container creation raise `ERROR: ... : No space left on device`
  $ cat /workspaces/.codespaces/.persistedshare/creation.log

• 📦 Warning: Clock skew detected. Your build may be incomplete (Mostly fixed; closed all open files.):
  ⚠️ Issues mostly fixed by closing all currently open files.
  ⚠️ ⏻ Restart Computer, If Needed.
  $ make clean
  $ find . -exec touch {} +
  $ python -m pip install --no-build-isolation --no-cache-dir -e . -v

━━━━━━━━━━━━━━━━━━━━━━━━━━━━━━━━━━━━━━━━━━━━━━━━━━━━━━━━━━━━━━━━━━━━━━
✍  Starting Development
━━━━━━━━━━━━━━━━━━━━━━━━━━━━━━━━━━━━━━━━━━━━━━━━━━━━━━━━━━━━━━━━━━━━━━

• 🌿  Create a new branch before working:
  $ git checkout -b feature/my-new-feature

• ✍  Proceed to create a branch if you have uncommitted changes and are beginning work on a new feature or bug fix.
• 🔄  Read more: https://scikit-plots.github.io/dev/devel/quickstart_contributing.html#creating-a-branch
🚯 Stop Containers#
docker compose down
🐳 Docker Compose Configuration#
This project is based on Docker Compose and includes multiple services:
🔹 scikit-plots_latest-jupyter (CPU-Only)
Runs Jupyter Notebook using jupyter/tensorflow-notebook:latest
No CUDA support, best for lightweight tasks
Mounts the local folder scikit-plots to /home/jovyan/work
Runs on port 8888
🔹 app_nvidia_host_gpu_driver (Uses Host CUDA)
Runs Jupyter Notebook using jupyter/tensorflow-notebook:latest
Uses host-installed CUDA for GPU acceleration
Requires NVIDIA runtime enabled (–runtime=nvidia)
Runs on port 8889
🔹 app_nvidia_internal_gpu_driver (CUDA Inside Container)
Runs nvidia/cuda:12.6.3-cudnn-runtime-ubuntu24.04 with pre-installed CUDA
Includes NVIDIA GPU support without needing host CUDA
Requires NVIDIA runtime (–runtime=nvidia)
Runs on port 8890
🛠️ Custom Docker Commands#
If you need more control, you can use Docker CLI commands.
▶️ Build & Run the Container Manually
docker build -t my-custom-container -f docker/Dockerfile .
docker run -it --rm -p 8888:8888 my-custom-container
▶️ Check GPU Availability Inside Container
docker exec -it <container_id> nvidia-smi
📂 Folder Structure#
docker/
├── docker-compose.yml              # Primary Docker Compose file
├── docker-compose.override.yml     # Optional override file (auto-included if present)
├── Dockerfile                      # Custom Dockerfile
├── scripts/
│   ├── install_gpu_nvidia_cuda.sh  # GPU setup scripts
🖥️ Useful References#
📚 Jupyter Docker Stacks: Read the Docs
📚 Docker Compose: Official Docs
📚 LocalStack Installation with Docker Compose
📚 NVIDIA CUDA in Containers: NVIDIA Docs
🚀 Now you’re ready to run Jupyter notebooks in Docker! 😊